正则表达式及re模块 re 模块 match 函数
尝试用正则表达式模式从字符串的 开头匹配 ,如果匹配成功,则返回一个匹配对象;否则返回 None
案例:使用match函数匹配字符串 1 2 3 4 5 6 7 8 import reresult01 = re.match("\d{3}" , "123aavvfdfsf" ) print(result01) print(result01.group())
search 函数
在字符串中查找正则表达式模式的第一次出现,如果匹配成功,则返回一个匹配对象;否则返回 None。
案例 1 2 3 4 5 6 import reresult02 = re.search("\d{3}" , "abc666def456qqq" ) print(result02) print(result02.group())
findall 函数
在字符串中查找正则表达式模式的所有出现;返回一个匹配对象的列表
案例 1 2 3 4 5 import reresult03 = re.findall("\d{3}" , "abc666def456qqq" ) print(result03)
finditer函数
案例 1 2 3 4 5 6 import reresult04 = re.finditer("\d{3}" , "abc666def456qqq" ) for item in result04: print(item) print(item.group())
split 方法
根据正则表达式中的分隔符把字符分割为一个列表,并返回成功匹配的列表
字符串也有类似的方法,但是正则表达式更加灵活
案例 1 2 3 4 5 import reresult05 = re.split("-|\." , "hello-tar.gz" ) print(result05)
sub方法
把字符串中所有匹配正则表达式的地方替换成新的字符串
1 2 3 4 import reresult06 = re.sub("\d{3}" , "benben" , "Hi~123, nice to meet you, 456" ) print(result06)
compile函数
对正则表达式模式进行编译,返回一个正则表达式对象
不是必须要用这种方式,但是在大量匹配的情况下,可以提升效率
案例 1 2 3 4 5 6 7 8 9 import repatt_obj = re.compile ("\d{3}" ) result07 = patt_obj.search("abc666def456qqq" ) print(result07) print(result07.group()) result08 = patt_obj.split("abc123qwer890aaa" ) print(result08)
练习:分析 apache 访问日志 需求:编写一个apache 日志分析脚本(count_patt.py):
统计每个客户端访问 apache 服务器的次数
将统计信息通过字典的方式显示出来
分别统计客户端是 Firefox 和 MSIE 的访问次数
第一步:创建新的python文件count_patt.py,使用正则表达式过滤出IP地址和浏览器
1 2 3 4 5 6 7 8 9 10 11 import re def count_patt (fname, patt ): pass if __name__ == '__main__' : fname = '/root/access_log' ip = '(\d+\.){3}\d+' br = 'Chrome|MSIE|Firefox' result1 = count_patt(fname, ip) result2 = count_patt(fname, br) print(result1) print(result2)
第二步:编写函数count_patt()
1 2 3 4 5 6 7 8 9 10 11 12 13 14 15 16 17 18 19 20 21 22 23 24 25 import re def count_patt (fname, patt ): patt_dict = {} cpatt = re.compile (patt) with open (fname, mode="r" ) as fobj: for line in fobj.readlines(): m = cpatt.search(line) if m: key = m.group() if key not in patt_dict: patt_dict[key] = 1 else : patt_dict[key] += 1 return patt_dict if __name__ == '__main__' : fname = '/root/access_log' ip = '(\d+\.){3}\d+' br = 'Chrome|MSIE|Firefox' result1 = count_patt(fname, ip) result2 = count_patt(fname, br) print(result1) print(result2) [root@localhost xxx]
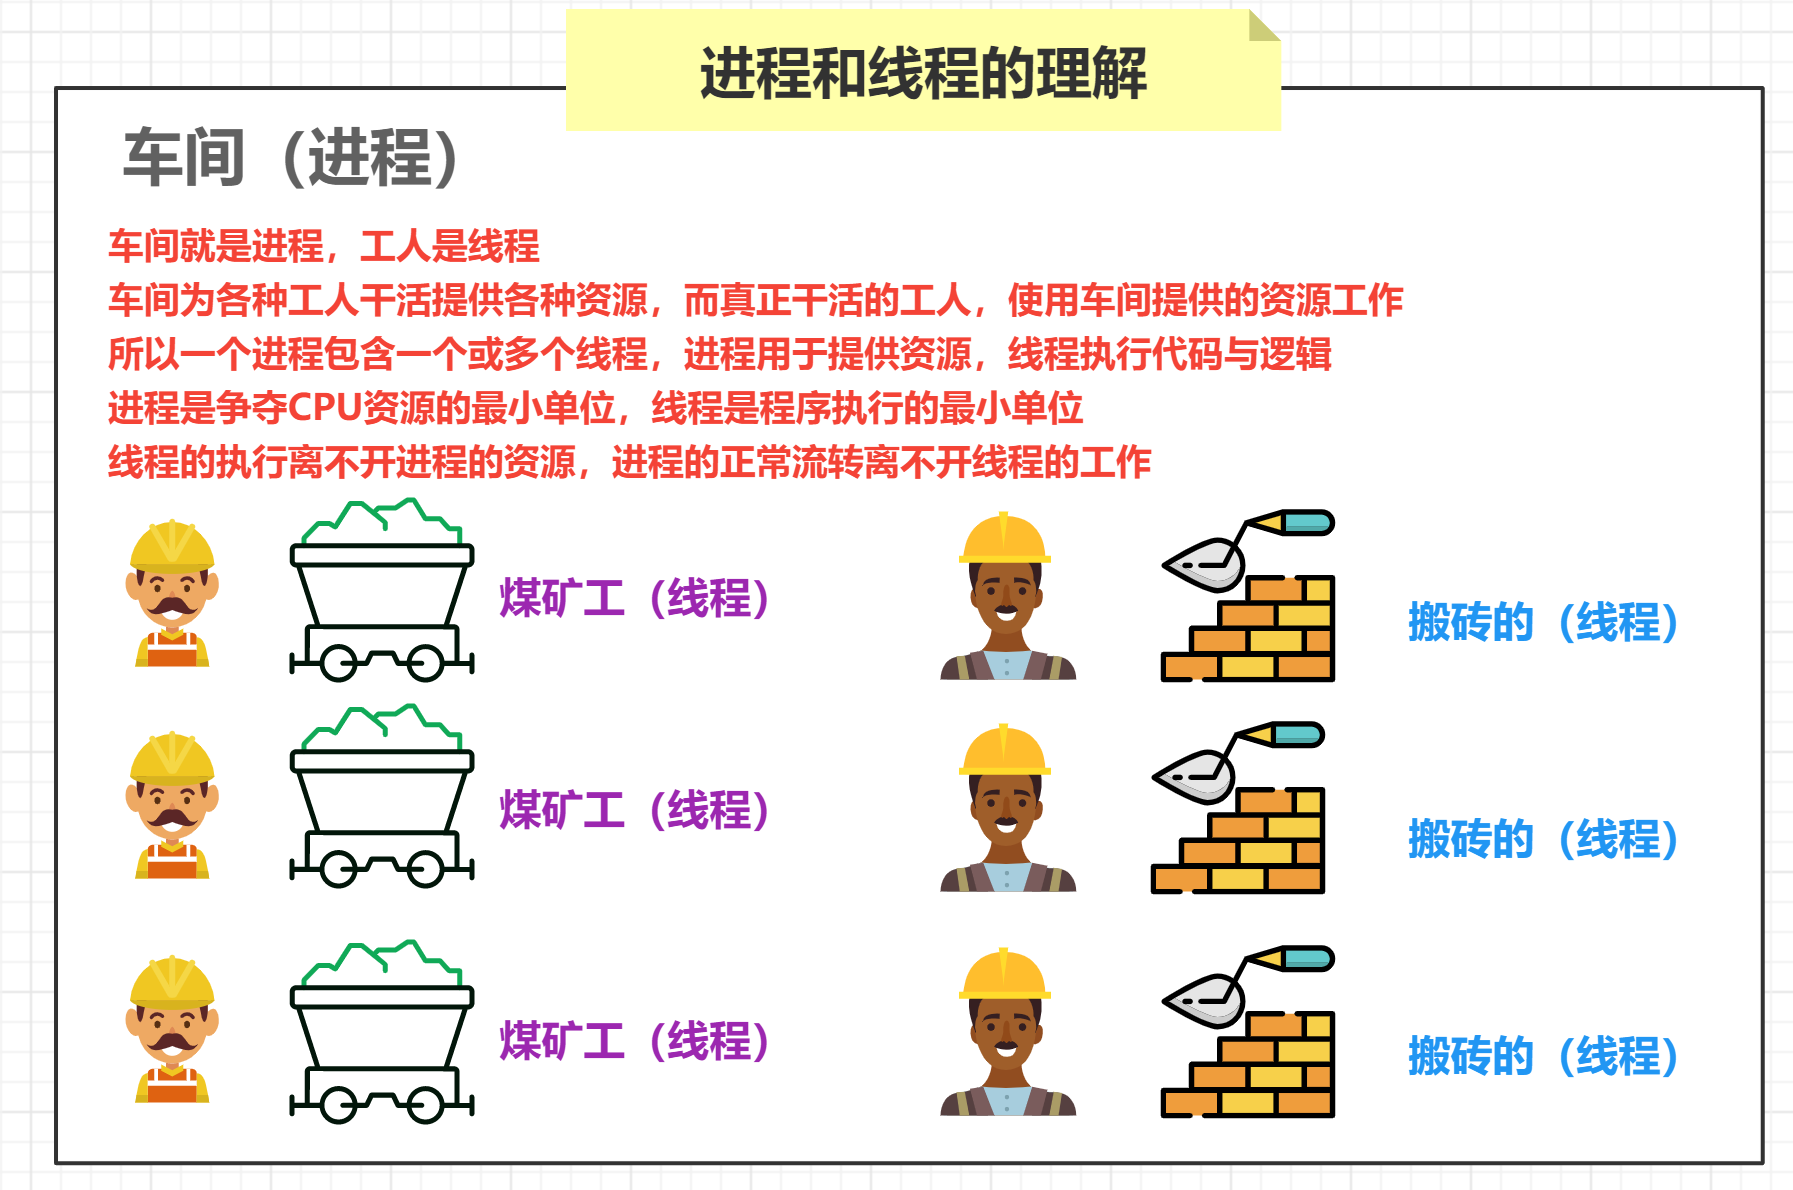
进程 概念 进程
计算机程序只不过是磁盘中可执行的二进制(或其他类型)的数据 进程(有时被称为重量级进程)是程序的一次执行 每个进程都有自己的地址空间、内存以及其它记录其运行轨迹的辅助数据(称之为上下文 context) 操作系统管理在其上运行的所有进程,并为这些进程公平分配时间(CPU)
线程
线程(有时被称为轻量级进程)跟进程有些类似,不同的是所有线程运行在同一个进程中,共享相同的运行环境 一个进程中的各个线程之间共享同一片数据空间,所以线程之间可以比进程之间更方便的共享数据以及相互通讯
理解(人话)
总结
进程是争夺 CPU 资源的最小单位,线程是程序执行的最小单位 线程的执行离不开进程的资源,进程的流转离不开线程的工作
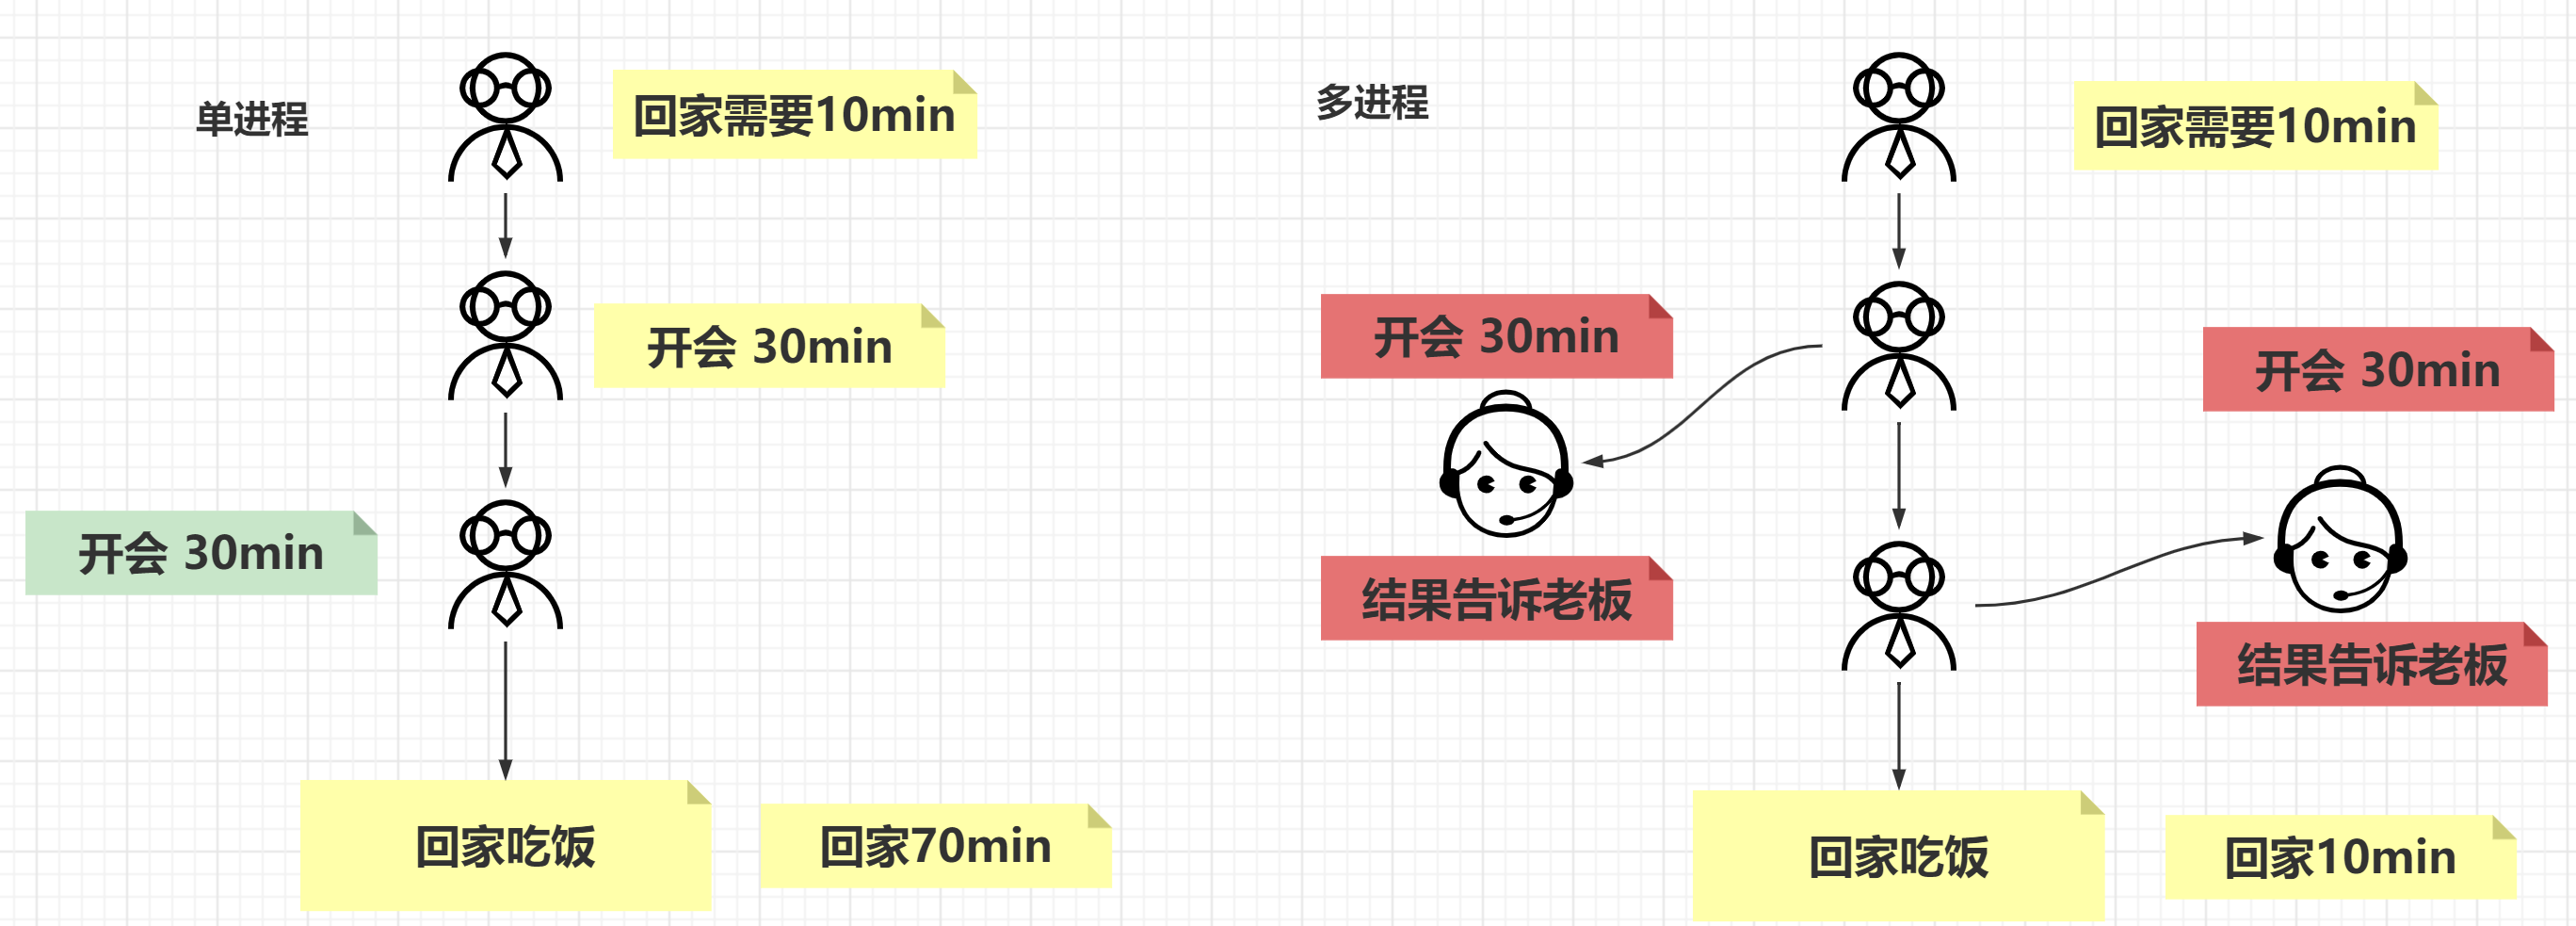
多线程 动机
在多线程(MT)编程出现之前,电脑程序的运行由 一个执行序列组成 ,执行序列按顺序在主机的中央处理器(CPU)中运行
无论是任务本身要求顺序执行还是整个程序是由多个子任务组成 ,程序都是按这种方式执行的
即使子任务相互独立,互相无关(即,一个子任务的结果不影响其它子任务的结果)时也是这样 如果并行运行这些相互独立的子任务可以大幅度地 提升整个任务的效率
工作特点
它们本质上就是 异步的 ,需要有多个并发事务
各个事务的运行顺序可以是 不确定的,随机的,不可预测的
这样的编程任务可以被分成 多个执行流,每个流都有一个要完成的目标
根据应用的不同,这些子任务可能都要计算出一个中间结果,用于合并得到最后的结果
理解
多线程编程 概念
*thread 和 threading * 模块允许程序员创建和管理线程
thread 模块提供了基本的线程和锁的支持,而 threading 提供了更高级别、功能更强的线程管理功能 推荐使用更高级别的 threading 模块
使用
多线程编程有多种方法,传递函数给threading模块的Thread类是介绍的第一种方法
Thread 对象使用 start() 方法开始线程的执行,直到线程结束
案例:三秒后打印内容 需求:使用多线程实现功能
【一般方法】
1 2 3 4 5 6 7 8 9 10 11 import timedef say_hi (): time.sleep(3 ) print('Hello World!' ) if __name__ == '__main__' : for i in range (3 ): say_hi()
【多线程】
1 2 3 4 5 6 7 8 9 10 11 12 13 14 15 16 import timeimport threadingimport threadingdef say_hi (): time.sleep(3 ) print('Hello World!' ) if __name__ == '__main__' : for i in range (3 ): t = threading.Thread(target=say_hi) t.start()
练习:扫描存活主机 需求:
通过 ping 测试主机是否可达
如果 ping 不通,不管什么原因都认为主机不可用
通过多线程方式实现并发扫描
分析:
subprocess.run() 方法可以调用系统命令,其返回值是系统命令退出码,也就是如果系统命令成功执行,返回0,如果没有成功执行,返回非零值
1 2 3 4 5 6 7 8 9 10 11 12 13 14 15 16 17 import subprocessimport threadingdef ping (host ): result = subprocess.run( 'ping -c2 %s &> /dev/null' % host, shell=True ) if result.returncode == 0 : print('%s: up' % host) else : print('%s: down' % host) if __name__ == '__main__' : ips = ['172.40.58.%s' % i for i in range (1 , 255 )] for ip in ips: t = threading.Thread(target=ping, args=(ip,)) t.start()
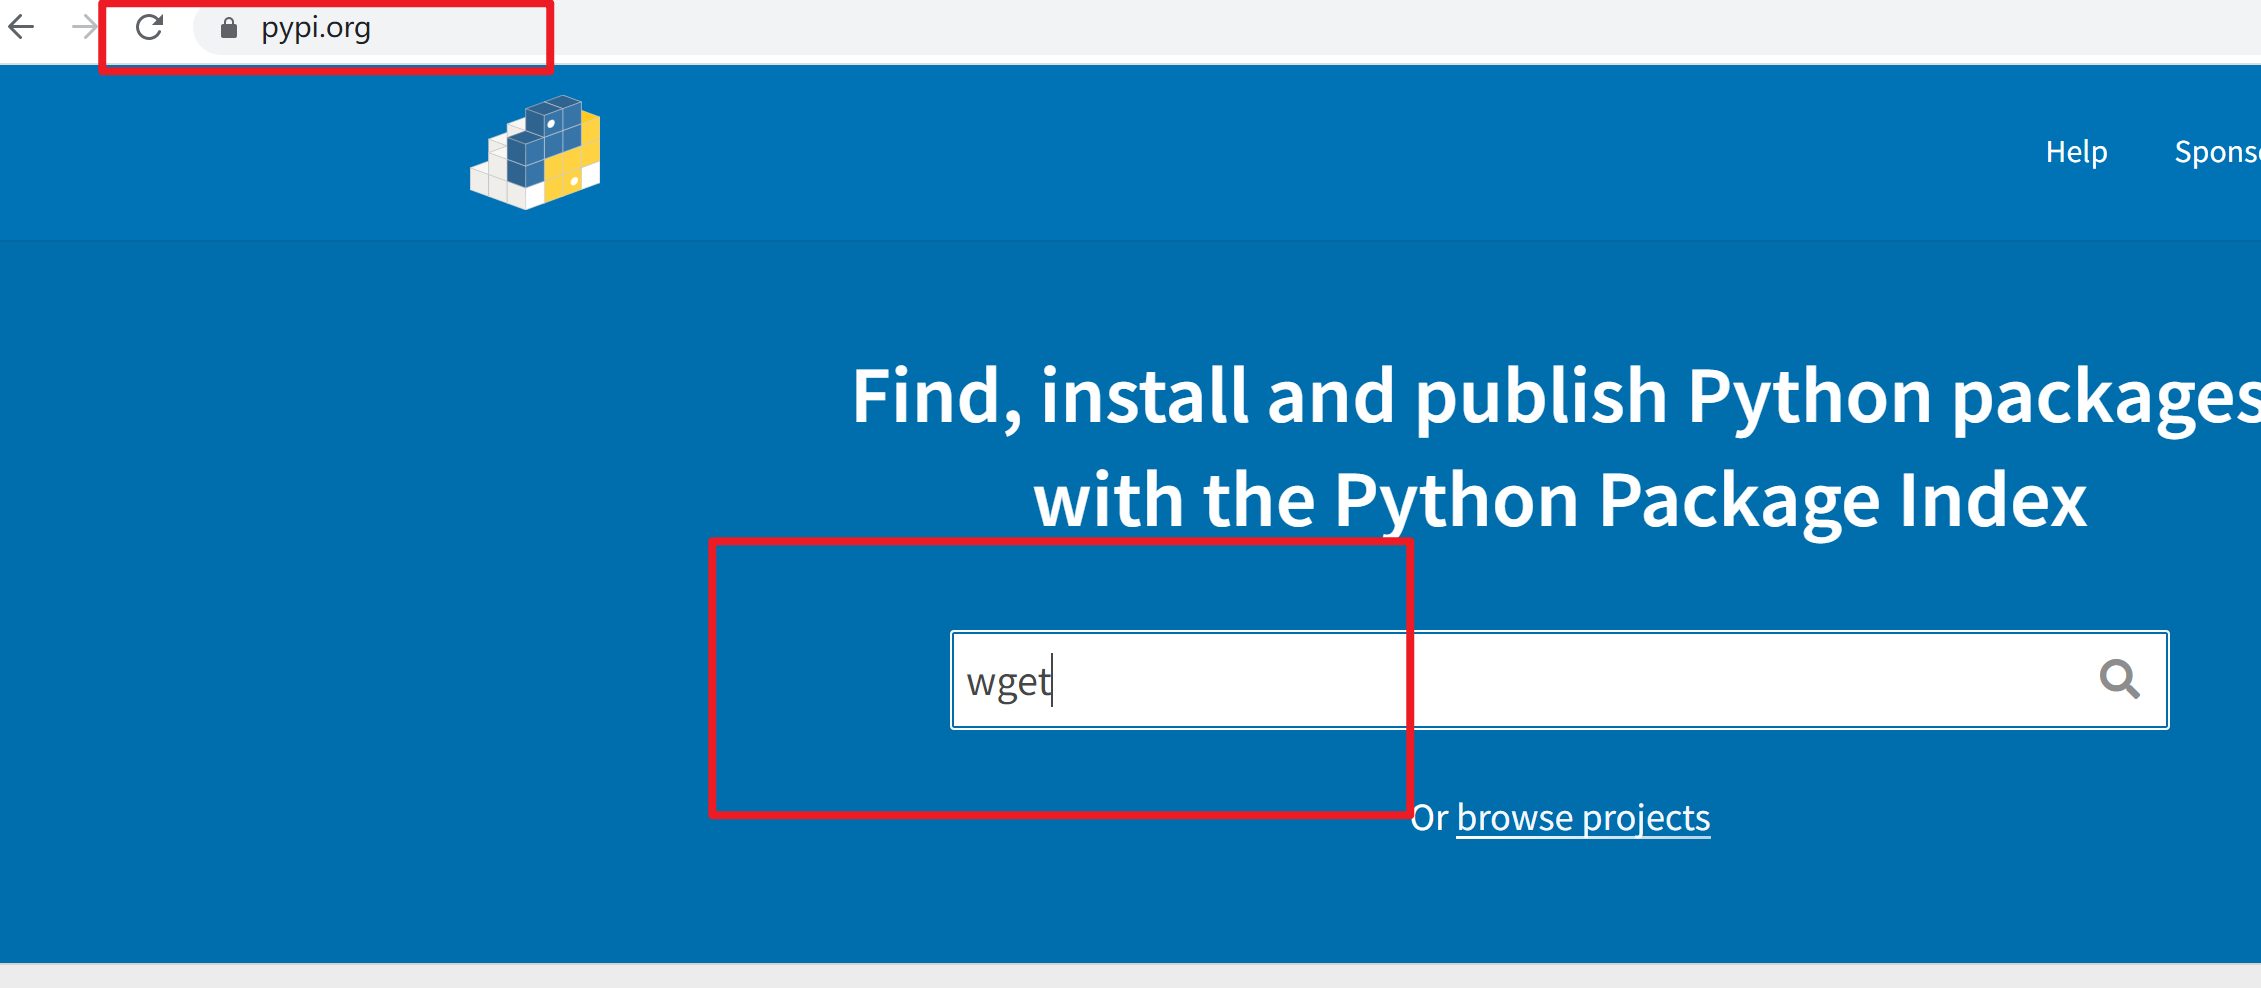
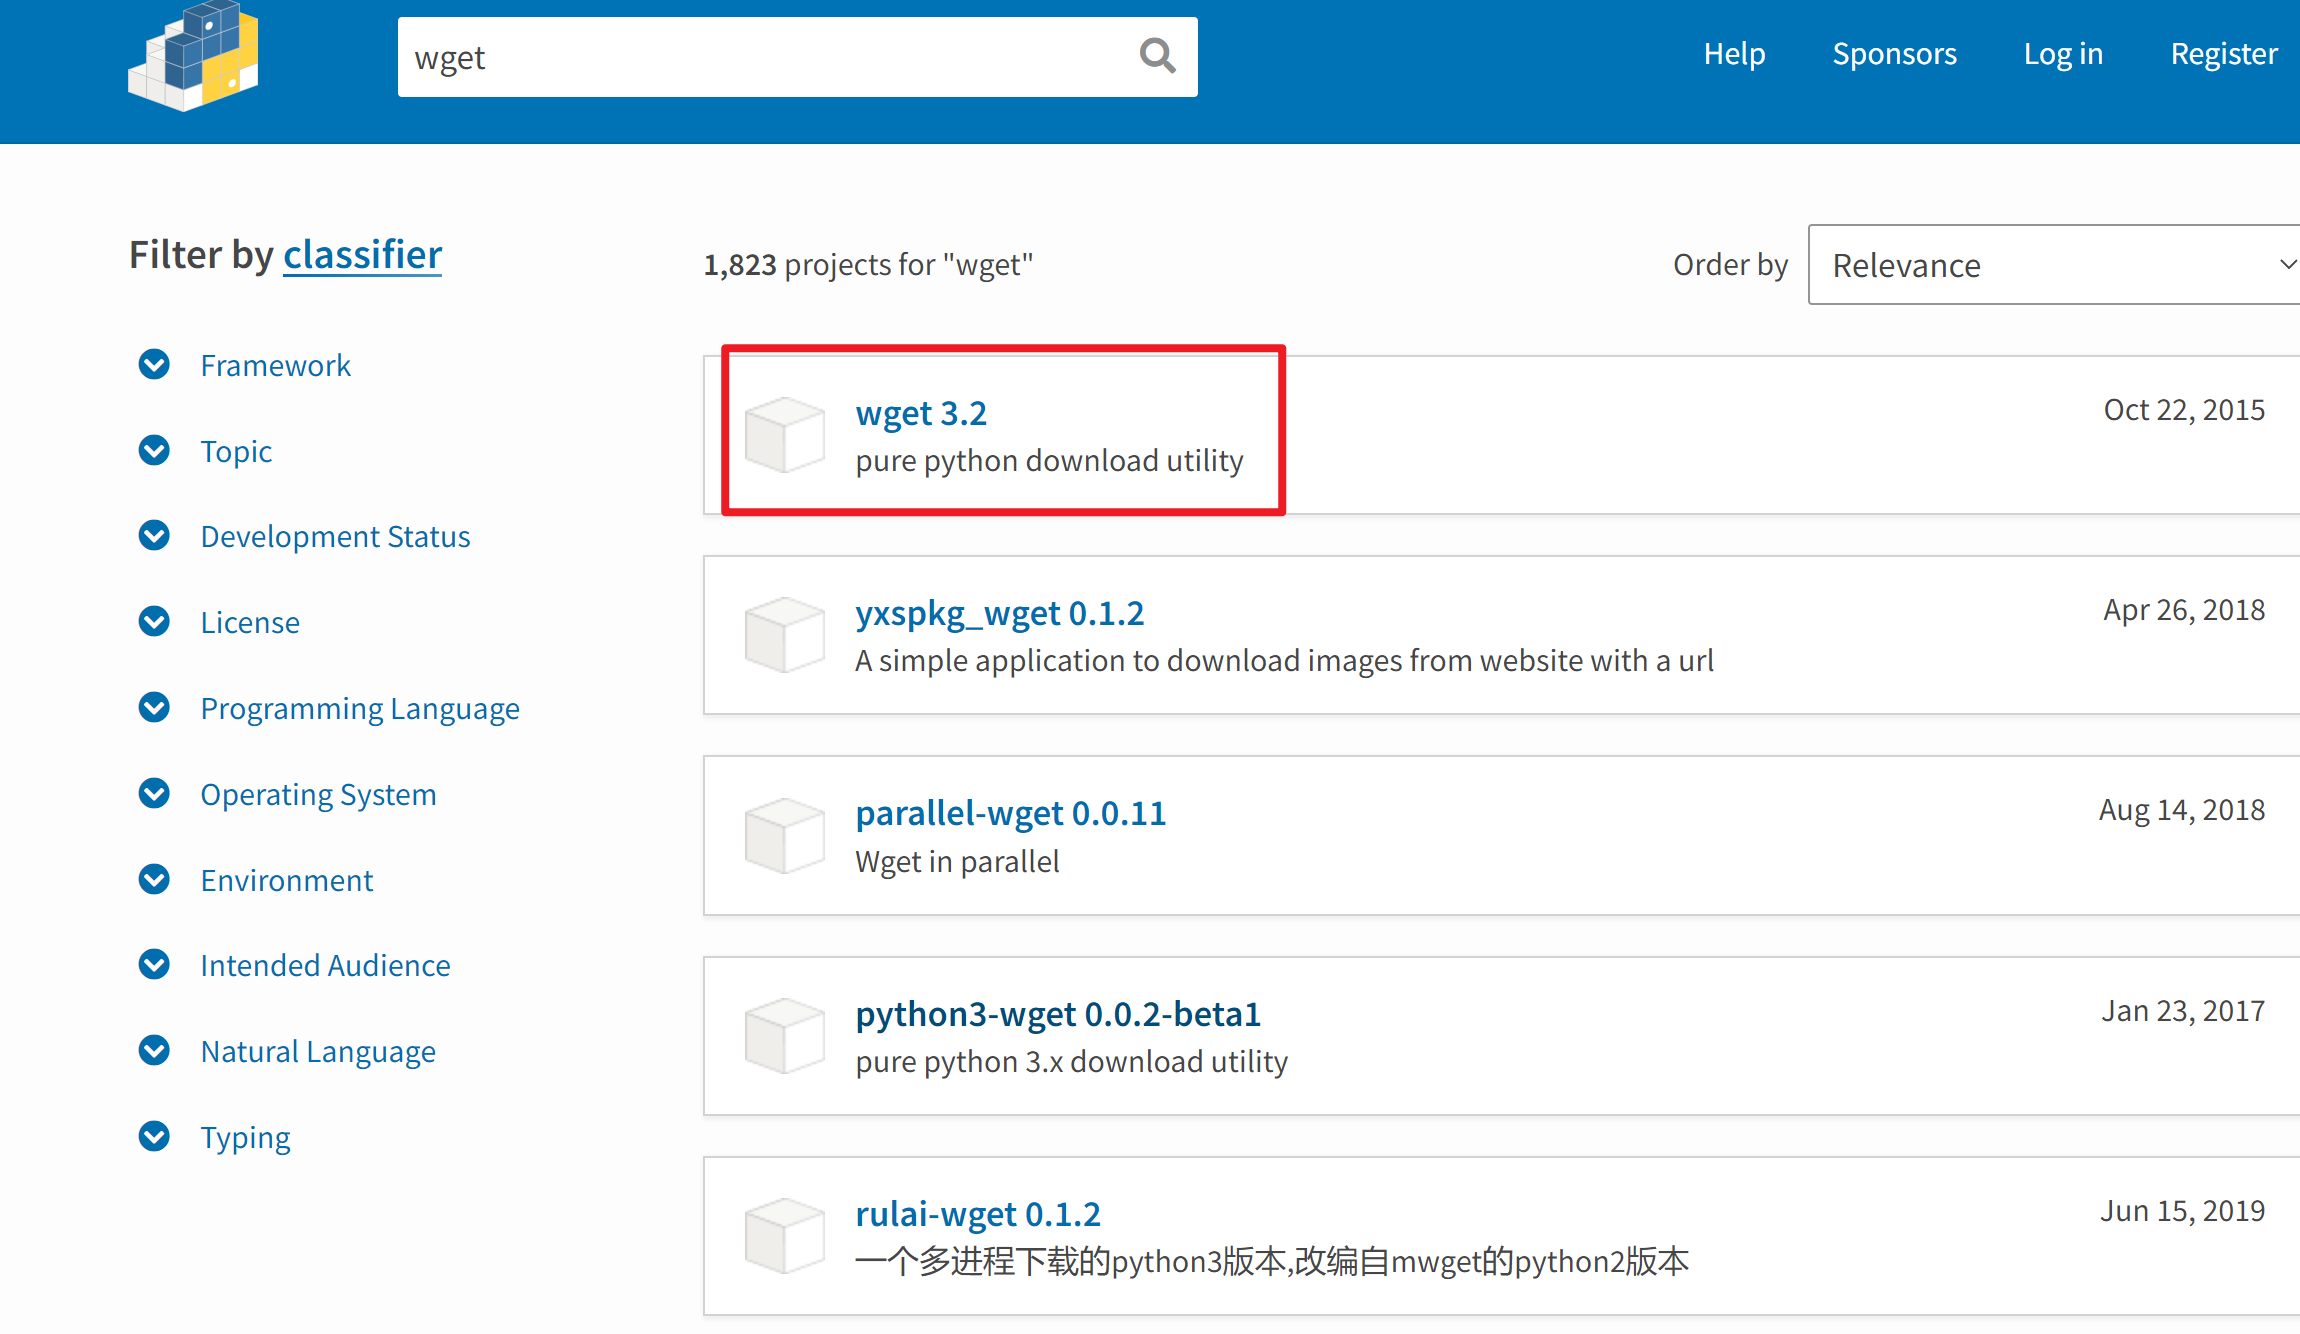
Python 模块安装 通过pip本地安装python模块
pip 是 Python 包管理工具提供了对 Python 包的查找、下载、安装、卸载的功能
下载模块后解压缩并安装
步骤 下载模块
演示离线安装 上传 wget-3.2.zip 到 pycharm 主机
1 2 3 4 [root@localhost ~]# unzip wget-3.2.zip # 解压 [root@localhost ~]# cd wget-3.2/ # 进入到wget解压目录下 [root@localhost wget-3.2]# python3 setup.py install # 安装wget [root@localhost wget-3.2]# pip3 list |grep -i wget # 查看wget的版本
在线安装模块 使用国内镜像站点 1 2 3 4 5 6 [root@localhost xxx]# mkdir ~/.pip #在root家目录下,创建隐藏目录.pip [root@localhost xxx]# vim ~/.pip/pip.conf #创建,配置国内镜像源,index-url 指定国内镜像源路径,trusted-host 信任该镜像网站,否则无法使用 [global] index-url=https://mirrors.aliyun.com/pypi/simple/ [install] trusted-host=mirrors.aliyun.com
演示在线安装 使用pip尝试安装,可以看到配置的国内镜像站点
1 [root@localhost xxx]# pip3 install wget